Have you noticed how popular sites like Facebook and Google are now giving you the ability to add two-factor authentication to improve security?
Well, now you can add two-factor authentication to your WordPress site. This makes sure maximum security for your WordPress site and all registered users.
In this article, we will discuss how to add two-factor authentication for WordPress using both Google Authenticator as well as and SMS text messages.
Why Add Two-Factor Authentication for WordPress Login?
One of the most common tricks hackers use is called brute force attacks. By using automated scripts, hackers try to guess the right username and password to break into a WordPress site.
If they steal your password or accurately guess it, then they can infect your website with malware.
One of the easiest ways to secure your WordPress website against stolen passwords is to add two-factor authentication. This way even if someone stole your password, then they will need to enter a security code from your phone to gain access.
There are multiple ways to set up 2-step login in WordPress. However, the most secure and easier way is by using an authenticator app. Simply click the links below to jump to the way you prefer:
- Method 1. Adding Two Factor Authentication in WordPress (Easier Method)
- Method 2. Adding Two Factor Authentication using Two Factor
Let’s take a look at how to easily add two-factor verification to your WordPress login screen for free.
Method 1. Adding Two Factor Authentication in WordPress
This method is easier and recommended for all users. It is flexible and allows you to enforce two-factor authentication for all users.
First, you need to install and activate the WP 2FA – Two-factor Authentication plugin. For more details, see our step-by-step guide on how to install a WordPress plugin.
Upon activation, you need to visit the User's» Your Profile page and scroll down to the ‘WP 2FA Settings section.
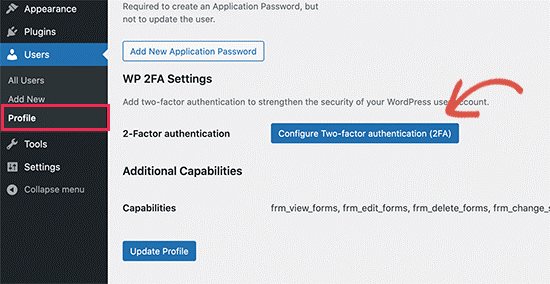
From here, you need to click on the ‘Configure Two-factor authentication (2FA)’ button to launch the setup wizard.
The plugin will now ask you to select an authentication method. It comes with two options:
- One-time code generated with your app of choice (Recommended)
- One-time code sent to you over email
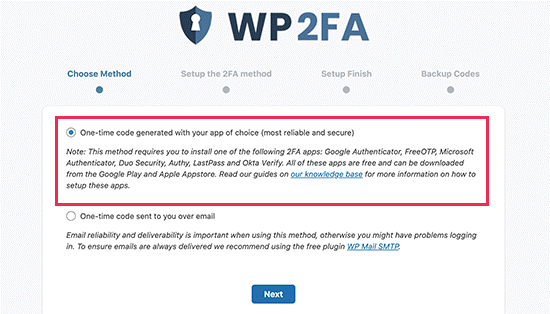
We recommend that you select the authentication via the app method, as it is more secure and reliable. Then click on the Next button to continue.
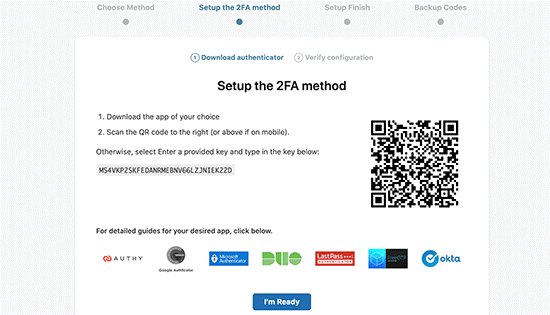
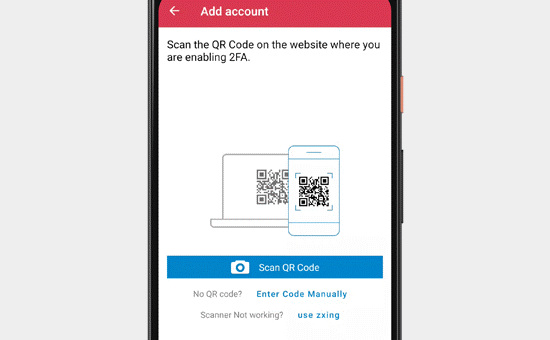
The plugin will now show you a QR code which you need to scan using an authenticator app.
What is an Authenticator App?
An authenticator app is a smartphone app that generates a temporary one-time password for the accounts that you save in it.
Basically, the app and your server use a secret key to encrypt information and generate one-time codes that you can use as the second layer of protection.
There are several such apps available for free.
The most popular one is Google Authenticator, however, it is not the best one. While it works great, it does not provide a backup that you can use in case your phone is lost.
We recommend using Authy since it is an easy-to-use and free app that also allows you to save your accounts on the cloud in an encrypted format. This way if you lose your phone, then you can simply enter your master password to restore all your accounts.
Other password managers like LastPass, 1password, etc all come with their own version of the authenticator which is all better than the Google Authenticator since they allow you to restore keys.
For the sake of this tutorial, we’ll be using Authy. You can follow our tutorial using a different app if you want since they all work the same way.
First, click on the Add account button in your authenticator app:

The app will then ask permission to access the camera on your phone. You need to allow this permission so that you can scan the QR code shown on the plugin’s Settings page.
The authenticator app will now save your website account, and it will start showing a one-time password that you can use to log in.
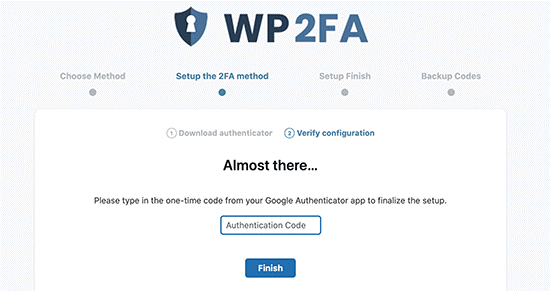
On the plugin’s setup wizard, click on the “I’m Ready” button to continue.
The plugin will now ask you to verify your one-time password. Simply click on your account in the authenticator app, and it will show you a six-digit one-time password that you can enter.
After that, the plugin will give you an option to generate and save the backup codes. These codes can be used in case you don’t have access to your phone. You can print these backup codes and put them somewhere safe.
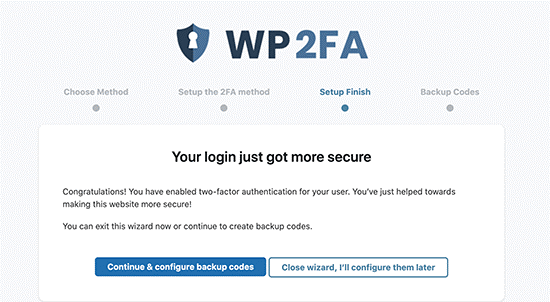
After that, you can exit the setup wizard.
Setting WP 2-FA Two Factor Login for All WordPress Users
If you run a multi-user WordPress website such as a membership site, then the plugin also allows you to enable or enforce two-factor authentication for all users on your site.
Simply head over to the Settings » Two-factor Authentication page to configure the plugin settings.
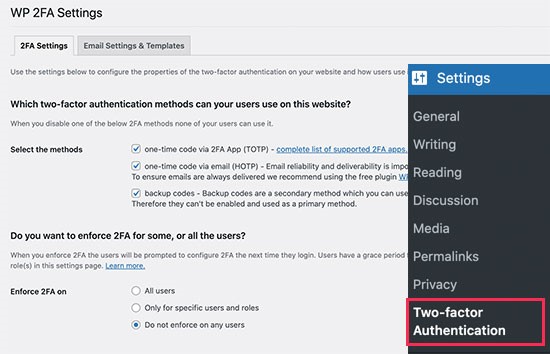
The plugin allows you to enable two-factor login for all users, make it compulsory for all users, and give users enough time to set it up.
If your WordPress website uses a custom login form page, then you can also create a custom page where users can manage their two-factor authenticator settings without accessing the WordPress admin area.
Don’t forget to click on the Save Changes button to store your new settings.
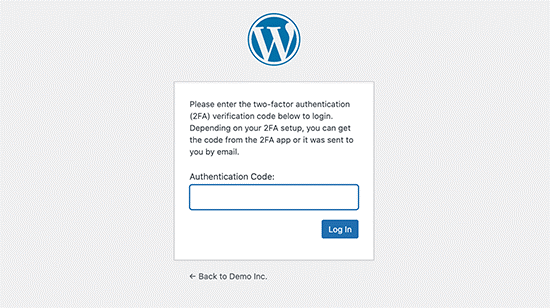
Here is how your default WordPress login screen will ask for the two-factor authentication code after users enter their regular WordPress password.
Method 2. Adding Two Factor Authentication using Two Factor
This method is a little less flexible as it does not allow you to enforce two-factor login for all users. Each user will have to set it up on their own and can disable it from their profile.
First, you need to install and activate the Two Factor plugin. For more details, see our step-by-step guide on how to install a WordPress plugin.
Upon activation, you need to visit the Users » Profile page and scroll down to the Two-Factor Options section.
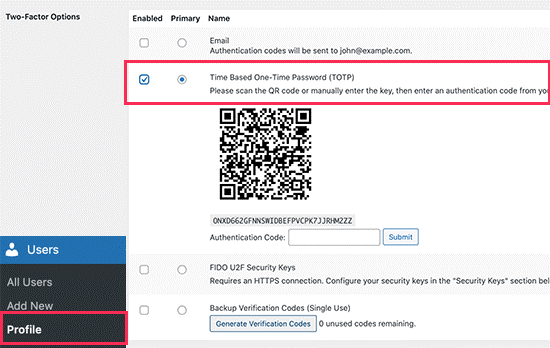
From here, you need to select a two-factor login option. The plugin allows you to use email, authenticator app, and FIDO U2F Security Keys methods.
We recommend using the authenticator app method. Simply download an authenticator app like Google Authenticator, Authy, or LastPass Authenticator and scan the QR code shown on the screen.

Once you have scanned the QR code, the app will show you a verification code that you need to enter into the plugin options and click on the Submit button.
The plugin will now set the secret key. You can reset this key at any time from the settings page to rescan the QR code.
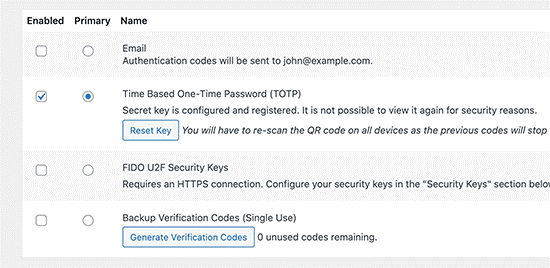
Don’t forget to click on the Update Profile button to save your settings.
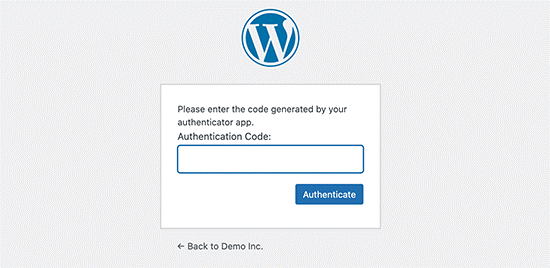
Now each time you log in to your WordPress website, you will be asked to enter the authentication code generated by the app on your phone.
Normally Asked Questions about Two Factor Authentication (2FA) in WordPress
Following are answers to some of the commonly asked questions about using a two-step login in WordPress.
1. How do I login if I don’t have access to my phone?
If you are using an authenticator app with a cloud backup option like Authy, then you can install the app on your laptop as well.
This gives you access to the authentication codes even when you don’t have your phone with you. It also allows you to easily restore your secret keys when you buy a new phone.
Both methods mentioned above also allow you to create backup codes. These codes can also be used as for one-time passcodes when you don’t have access to your phone.
2. How to log in without any codes?
If you don’t have access to your phone, laptop, or backup codes, then you can only log in by disabling the plugin.
See our guide on how to deactivate all WordPress plugins when not able to access the admin area.
Once you deactivate all plugins, it will also disable the two-factor authentication plugin and you’ll be able to login to your WordPress website. Once logged in, you can reactivate plugins and reset the two-factor authentication setup.
3. Do I still need to password protect the WordPress admin folder?
Website security works best when you have multiple layers of security to secure your website, starting with the basics like using HTTPS and protecting WordPress hosting. The 2-factor verification makes your WordPress login secure, but you can make it even more secure by password protecting the WordPress admin area.
This comes in handy if you have a WordPress membership website, an online store, or an online course website. Your users will be able to log in securely, but they will not be able to access the WordPress admin area.
We hope this article assisted you to add 2-factor verification for WordPress login. You may also want to see our list of the best virtual business phone number apps or our guide on how to get a free SSL certificate for your WordPress site.
