The Apache Tomcat is a free, open-source Java-based web application that offers an HTTP webserver environment to run Java applications. It assists in the implementation of the JavaServer Pages, Java Expression Language, Java Servlet, and Java WebSocket technologies. Recent studies show that Apache is one of the most extensively adopted applications and web servers. It is robust and easy to use. If you want to run web pages with Java server page coding or Java servlets Tomcat is useful. Some of the additional features of Tomcat 9, when compared to other Tomcat versions, are:
- Apache supports HTTP/2.
- It supports TLS virtual hosts (SNI).
- It supports the use of OpenSSL with the JSSE connectors for TLS support.
This article assists you to install and configure Apache Tomcat 9 on Ubuntu 18.04 server. Please note that you can use this instruction to install and configure Apache Tomcat 9 on Ubuntu 16.04, other Ubuntu-based distributions, Elementary OS and Linux Mint.
Prerequisites
- Log in to the Ubuntu server as a user with Sudo privileges.
- Steps to Install and Configure Apache Tomcat 9 on Ubuntu
To install Apache Tomcat on your Ubuntu server, follow the below steps:
1) INSTALL JAVA
Tomcat assists you to run Java-based web applications, so it is necessary to install Java on your server. First, you need to update the apt packages before installing OpenJDK. Run the following commands to install OpenJDK.

2) CREATE A TOMCAT USER
For security purposes, we should disable direct root access in Tomcat. For the same, make a new system user and group in the home directory ‘/opt/tomcat’ on which the Tomcat service runs.
To make a tomcat group, run the following command.

Next, make a tomcat user a member of the tomcat group under the ‘/opt/tomcat’ home directory.

3) DOWNLOAD AND INSTALL APACHE TOMCAT
Download the Tomcat 9 latest binary release from the official Tomcat downloads page: https://tomcat.apache.org/download-90.cgi.
Run the following wget command to install the Tomcat archive in the /tmp directory.

After the download, extract the Tomcat archive and move the extracted copy to the /opt/tomcat directory.

Make a symbolic link called ‘new’ and point it to the Tomcat installation directory to have more control over the Tomcat updates and versions.

If you want to upgrade your Tomcat version, then unpack the newer version and point the symlink to the latest version.
Change the directory ownership of the latest installed Tomcat using the following command.

Next, create the script inside the ‘/opt/tomcat/new/bin’ executable by using the following command.

4) CREATE A UNIT FILE
To run Tomcat on your server, you need to generate a new unit file. To generate the systemd unit file, follow the below steps:
Open a text editor and generate a file called ‘tomcat. service’ in the ‘/etc/systemd/system/’ directory.

In the tomcat, Service unit file, paste the following configuration. In the below configuration file, replace the flag with the path of your Java installation.
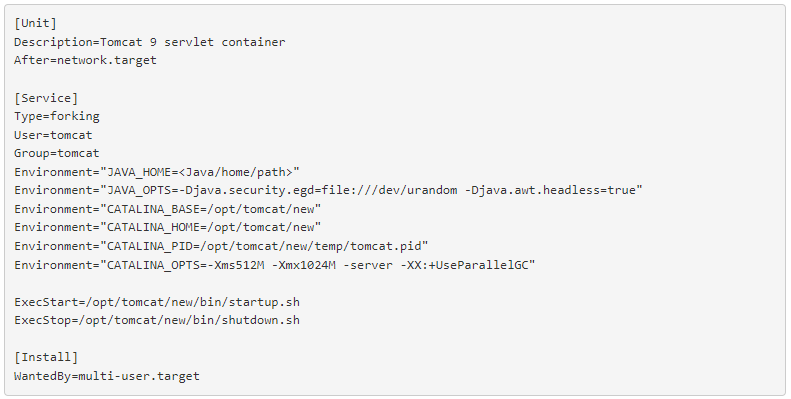
To find the path of the Java installation, run the following command. Replace the JAVA_HOME variable in the above configuration file with the result of the following command.

Save and close the unit file.
Update the system that we have generated a new unit file by using the following command.

Next, start the Tomcat service.

After staring, check the status of the Tomcat service by running the following systemctl command.

If the status of the Tomcat service is up, then enable it to start up during the reboot.

5) ADJUST THE FIREWALL SETTINGS
If the server is firewall secure and you want to access Tomcat from other networks, then you need to open the 8080 port in the firewall. To allow the traffic on 8080 port, run the following ufw command from the home directory.

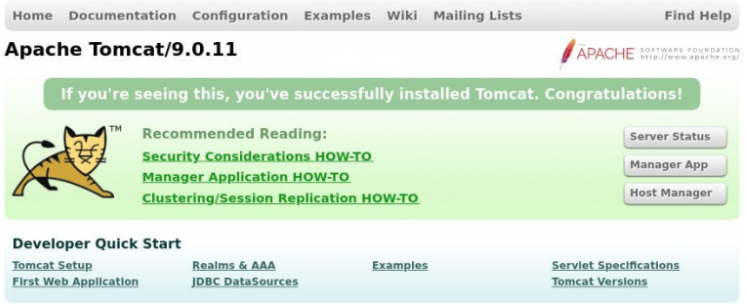
6) TEST TOMCAT INSTALLATION
To test if the Tomcat installation and configuration finished without any error, do the following.
Open any web browser.
Then, hit any of the following links on your browser.

The above link opens a screen similar to the one shown below if the installation and configuration were successful.
7) TEST APACHE TOMCAT
To test if the Apache Tomcat service runs smoothly, follow the below process.
Generate a test file with .jsp extension under the ‘/opt/tomcat/webapps/ROOT/’ directory.

In the test file, paste the following html Java code.
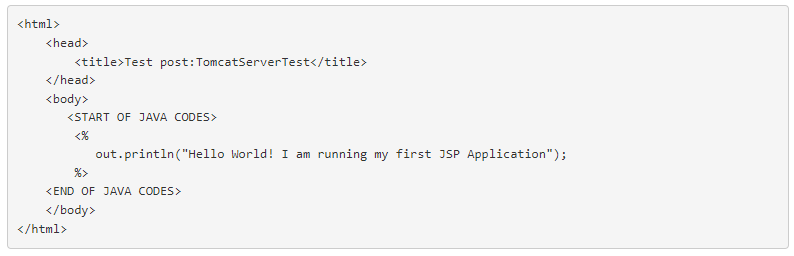
Save and close the file and then change the ownership permission by using the following command.

Now, if the Tomcat is working smoothly, you can see the following content on the web page, if you hit the browser by using the link: http://:8080/test.jsp.

We hope this article was helpful to you. If need any further help contact our support department.
