SendGrid provides a cloud-based service for sending reliable transactional and marketing emails. It also provides scalability and real-time analytics, along with flexible APIs that make custom integration easy. This service usually manages different sorts of emails, including shipping notifications, friend requests, sign-up confirmations, and email newsletters. This service was earlier known as ‘smtpapi.com’ before naming it SendGrid.
Configure a Domain to Use SendGrid SMTP
You can configure your cPanel & WHM managed domain to use SendGrid’s SMTP mail server using the following steps:
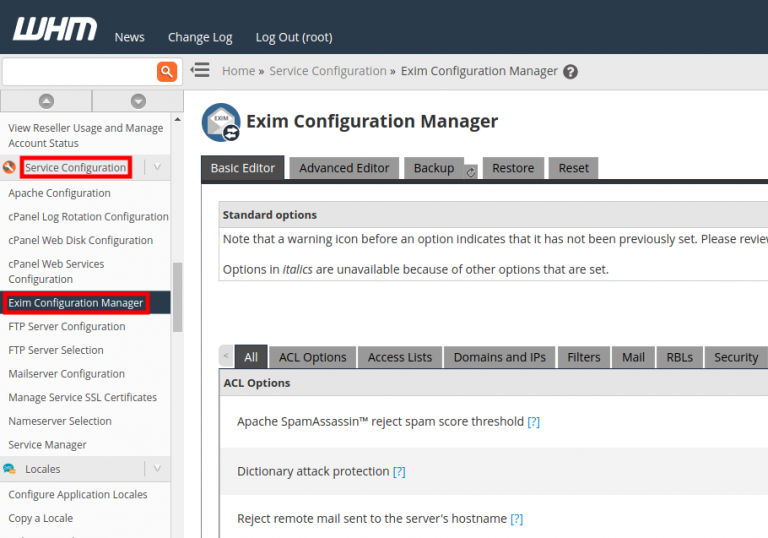
1) Log in to WHM as the root user.
2) Navigate to the ‘Service Configuration’ tab and choose the ‘Exim Configuration Manager’ option.
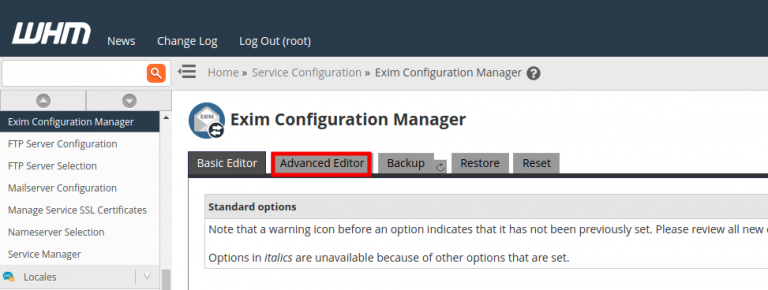
3) Click the ‘Advanced Editor’ tab.
4) Navigate to the section called ‘Section: AUTH’ by using the ‘Find’ function of your browser since this configuration file is rather large. In this section, you need to add the following configuration into the textbox. In the following piece of configuration, replace the “YourSendGridUsername: YourSendGridPassword’ with your SendGrid username and password.

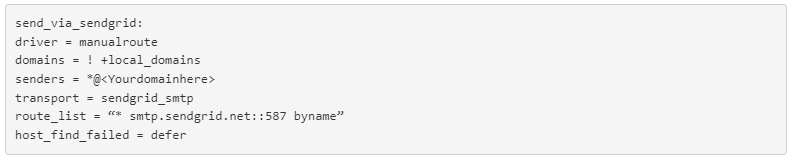
5) Move to the section called ‘Section: PREROUTERS’ and paste the following configuration in the textbox. Replace the ‘*@Yourdominhere’ data with your domain name before pasting it in the textbox. If you want to cover the entire server, then you can replace the ‘*@Yourdominhere’ with an asterisk, for instance: ’*@*’.
6) Next, move to the section called ‘Section: TRANSPORTSTART’ and paste the following configuration into the textbox.

7) Save all the changes to the Exim’s configuration file.
8) Execute the following command on your server to apply changes.

9) Now you can send and receive emails through SendGrid. You can check the same in the Exim log by logging into the shell and running the below command.

How to Send an SMTP Email with Telnet
SMTP or simple mail transfer protocol is one of the quick and straightforward ways to send emails from one server to another. The SendGrid provides an SMTP that allows delivering your emails via its server instead of yours. The developer can specify the custom handling instructions for email using the SendGrid’s SMTP API.
SENDING SMTP EMAIL WITH TELNET
The pre-requisition for sending the SMTP email with Telnet are:
1) First, you need to create a SendGrid API key on the API Keys Page.
2) Convert your API key to Base64, as it is not secure to paste your API key into an external website for a conversation. You can use the pre-installed OpenSSL Package to convert the API key to Base64 if you are on a Linux or Mac System. You can use the following command to convert the API key using OpenSSL.

Follow the following steps to send an email using Telnet. Please note that Telnet does not register backspaces.
1) To start the session, type the following command in the terminal.

SendGrid accepts TLS and non-encrypted connections on ports 25, 587, and 2525. Some of the hosting provider blocks port 25 as default, so you can contact them to find out which ports are open for outgoing SMTP relay. For an SSL connection, you can use port 465. It is recommended to use port 587 to avoid any server host-level rate limit.
2) After successfully connecting to the SendGrid, you need to log in to the server by typing the following. The Mailserver then responds with a Base64 encoded request for your username.

If this throws the following error message, then you need to install Telnet on your machine.

3) Now, input the API username details encoded in Base64. In API, the username is ‘apikey’, and this encodes as ‘YXBpa2V5’ in Base64.
4) Once you give the username, the mail server responds with ‘334 UGFzc3dvcmQ6’. This response is a Base64 request for your password (API Key), and you can give the Base64 converted API key as the password in the next line. If you successfully connect to the smtp.sengrid.net over the chosen port and with the given API key, the mail server responds with ‘235 Authentication Successful’ message.
5) Next, you need to give the email address in the following format. If the mail server accepts the email address, then it responds with ‘250 Sender address accepted’ message.

6) Then add the recipient’s email address in the following format, and if the mail server accepts the email address, it responds with the ‘250 Recipient address accepted’ message.

7) In the next line, type ‘DATA’ to indicate the server that you are going to type the email content.
8) If you want to add the name and email address of the recipient to the email header, then you can type the following.

9) Next, you need to add the name and email address of the sender to the email header, and then you can type the following. Note that, if you don’t include this, then SendGrid blocks your email as it does not follow RFC 5322 compliance guidelines.

10) To include the subject line, you can add the following.

11) You can type the content of the message: in the next line. For example: “Test email”.
12) Finally, send the email with a period and then press the enter.
The mail server returns ‘250 ok: queued as …’ message, this response means the email is queued to send.
13) To exit the Telnet connection, you can type the following in the command line.

Integrating with the SMTP API
To integrate with SendGrid SMTP API, you can follow the following steps:
- Create an API key with a minimum of ‘Mail’ permissions.
- Set the server host as ‘smtp.sendgrid.net’ in your email client or application. This setting sometimes refers to the external SMTP server or the SMTP relay.
- Set the username to ‘apikey’.
- Set the API key generated in Step one as the password.
- Then, set the port to 587.
Some of the rate limits in the SMTP are:
- With each SMTP connection, you can send up to 100 messages.
- From a single server, you can open up to 10 concurrent connections.
The limits may change with different Email service providers. It may also change with plans in the same service provider.
If you are stuck somewhere in this process or need our help, please contact our support department for quick help!
