This article shows how to install and configure fail2ban to assist secure a server. With fail2ban, you can configure your server to automatically block IP addresses that engage in suspicious activity.
About fail2ban
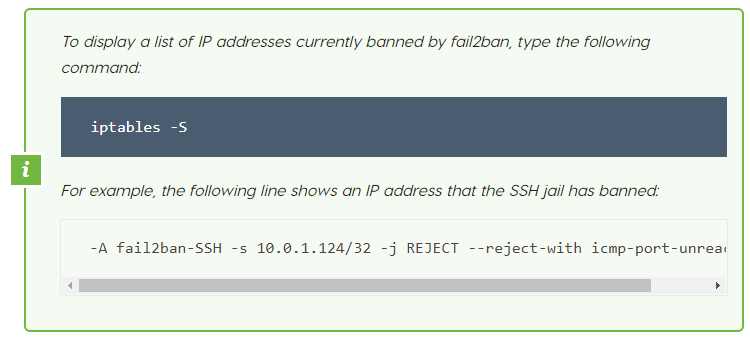
The fail2ban application monitors server log files for intrusion attempts and other suspicious activity. After a predefined number of failures from a host, fail2ban blocks its IP address automatically for a specific duration.
With fail2ban, you can assist protect your server against unauthorized access attempts. It is particularly effective in reducing the risk from scripted attacks and botnets.
Installing fail2ban
To install the fail2ban package for your Linux distribution:
For Debian and Ubuntu, type the following command:
For CentOS and Fedora, type the following command:

Configuring fail2ban
After you install fail2ban, you are ready to configure it. To do this, follow these steps:
1. Log in to your server using SSH.
2. At the command prompt, type the following command:
The jail.conf file contains a basic configuration that you can use as a starting point, but it may be overwritten during updates. Fail2ban uses the separate jail. Local file to actually read your configuration settings.
3. Open the jail. Local file in your preferred text editor.
4. Locate the [DEFAULT] section, which contains the following global options:
ignoreip: This option enables you to specify IP addresses or hostnames that fail2ban will ignore. For instance, you could add your home or office IP address so fail2ban does not prevent you from accessing your own server. To specify multiple addresses, separate them with a space. For instance:
bantime: This option defines in seconds how long an IP address or host is banned. The default is 600 seconds (10 minutes).
maxretry: This option defines the number of failures a host is allowed before it is banned.
findtime: This option is used together with the maxretry option. If a host exceeds the maxretry setting within the time period specified by the find time option, it is banned for the length of time specified by the bantime option.
5. With fail2ban's global options configured, you are now ready to enable and disable jails for the specific protocols and services you want to protect. By default, fail2ban monitors SSH login attempts (you can search for the [ssh-iptables] section in the jail. Local file to view the specific settings for the SSH jail).
6. Save your changes to the jail. Local file.
7. To restart the fail2ban service and load the new configuration, type the following command: