MySQL does not need any introduction. It is one of the most popular database management systems available right now. It is open-source and several popular websites use MySQL. Do you know that Wikipedia also uses MySQL as a database management system? MySQL is popular because of the functions and features it is providing to the users. If you connect with your MySQL server remotely, you can secure the MySQL connection with SSL/TLS.
In this article, I will show you how to enable SSL/TLS in your MySQL server. Enabling SSL/TLS will allow you to transfer data from server to customer and visa-versa securely. If you do not know much about SSL/TLS, let me tell you a bit about it.
SSL stands for Secure Socket Layer and TLS stands for Transport Layer Security. Both of them are a type of synonymous with each other. SSL/TLS simply encrypts the data that is being transferred between server and customer. In the case of MySQL, your MySQL server is a server and your local machine is a customer. Enabling SSL/TLS security will allow you to securely send data to your server.
As you finally know what we are going to do, we can move on to the actual article. Here are the prerequisites.
Prerequisites
You just need a server with MySQL already installed. If possible, do not try new things on the actual server that is running in a production environment.
Once you have a server and you have installed MySQL on it, we can start with the first step. It is not so hard to secure MySQL connections with SSL/TLS, just understand the steps we are taking and you will do it on your own the next time.
Verify Current SSL Status
It is possible that SSL/TLS encryption is already enabled on your server. We can check if it is already active. Execute the following command in your console to log in to your MySQL server.

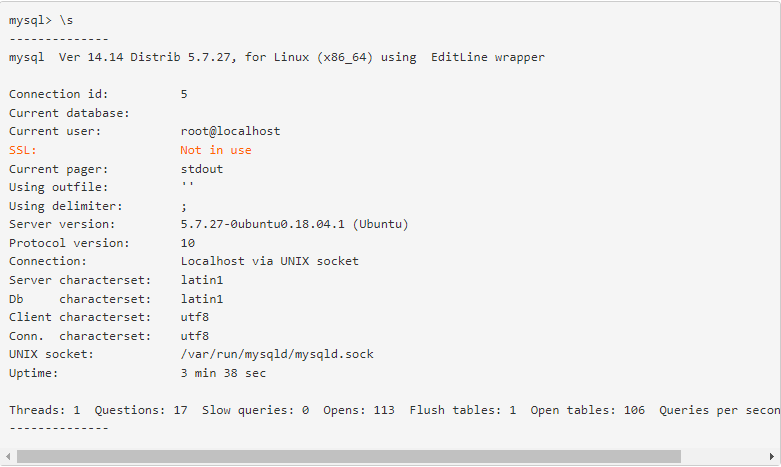
Enter the correct MySQL server and you will be logged in to your MySQL server. Once you are in, execute the following command to check the current status of SSL. I have attached the command as well as the expected output.

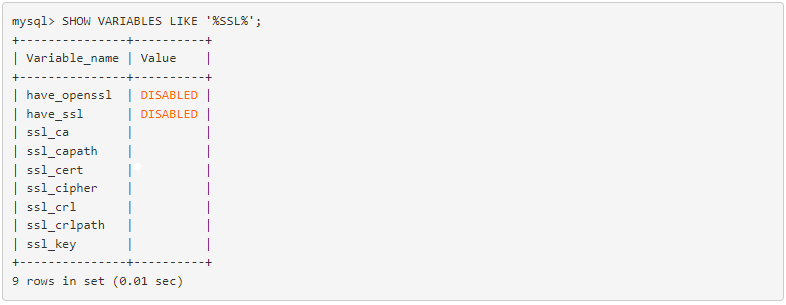
If you can see Not in Use corresponding to SSL in the status command, SSL is not enabled. You can also run the following query to check the status.

So, if you are getting similar outputs, SSL is not yet active on your MySQL server and your MySQL connections are not secure. Now, Let’s see how to secure MySQL connections with SSL.
Create and Enable SSL Certificate
Creating an SSL certificate for MySQL is the easiest task in this guide. If you are using Ubuntu 16.04 or up, you just have to run a single command to create an SSL Certificate and key files for your MySQL server.
Execute the following command in your console to create an SSL certificate and keys for MySQL.

It will take a few seconds to create the required files. Note that this is a self-signed SSL certificate. The SSL certificate and key files are stored at /var/lib/mysql directory. If you want to see the files that were generated using the previous command, execute the following command in your console.
![]()
It is good to check if the files are successfully created. Sometimes you might see an error when you run a command to create an SSL certificate even if the Certificate files are created successfully.
Once done, we can enable SSL Encryption on our MySQL server. In order to enable the certificate, we have to restart the MySQL service. Execute the following command to do so.

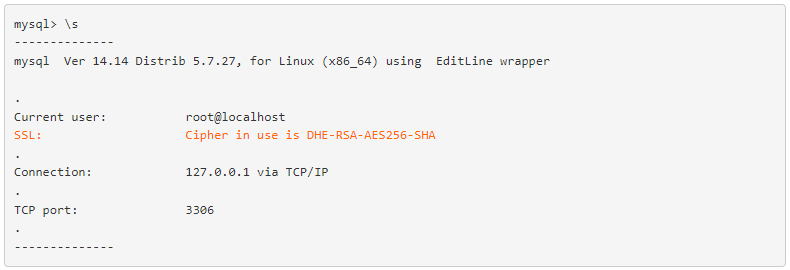
That is all, your MySQL connections are secured with SSL now. Let’s verify it and then learn how to force users to connect securely to the MySQL server. To verify if SSL is actually working, log in to your MySQL server and mention the host just like this.

Once you are logged in, execute the same \s command and you should see the following output.

Similarly, if you will run the other command to choose variables with the SSL that we mentioned above, it will show YES instead of disabled. Finally, we can move on to set up a user account with remote access and SSL required.
Strictly Require SSL and Enable remote connections
In this step, we will update the MySQL configuration file to update the bind-address directive and make the SSL connection mandatory. Execute the following command to open the MySQL configuration file in edit mode.

Once you are in, add the following lines at the end of the file.

The bind-address directive will enable the remote connections and require_secure_transport will make SSL connections mandatory. Restart the MySQL server using the following command to apply changes.

Now, Let’s create a user that can remotely connect with our MySQL server.
Create User with Remote Access
Here we will create a user with remote access on the MySQL server. But our MySQL server will only allow it if the connection is secured with SSL/TLS. We will create a database, a user and we will grant all privileges on that database to the user.

The REQUIRE SSL clause we added in the query will force users to connect over SSL only. Now, Let’s create a database and grant all privileges on that database to our users.

Do not forget to replace placeholders and example names with the actual information. Once the user is ready, you can test the connection by connecting from the IP address you used while creating a user. You can use the following command to connect to the remote MySQL server.

After connecting to the server, execute the \s command and check the SSL status just like we did before. So, that is all you need to do to enable SSL on MySQL connections.
Conclusion: If you are connecting to your MySQL server remotely, you must turn on SSL/TLS to improve the security of your data. It just takes a few commands and some editing in configuration. If you want to go advanced, you can move customer keys to the customer so that your server and customer have a single CA (Certificate authority) that both can trust, it will further improve the security of your connections.
Let us know if you need help enabling SSL/TLS on MySQL in the comment

