This article describes the way to connect your local customers to webmail calendars and contacts using CalDAV and CardDAV.
CalDAV enables users to access and share calendar scheduling information on a remote server. Similarly, CardDAV is an address book customer/server protocol that enable users to access and share contact data on a remote server.
Apple clients provide native support for CalDAV and CardDAV. CalDAV and CardDAV plugins are available for Microsoft Outlook and Thunderbird. Installable apps for CalDAV and CardDAV are available on Android phones.
Step 1: Get the remote configuration
Before you can set up a local client, you need to get the remote configuration. To do this, follow these steps:
1. Log into your webmail account at http://www.example.com:2096, where example.com represents your domain name.
2. On the top menu bar, click the name of the account to show the preferences and settings menu. In the following image, the account name is user@example.com:

3. Select Calendars and Contacts from the preferences and settings menu:

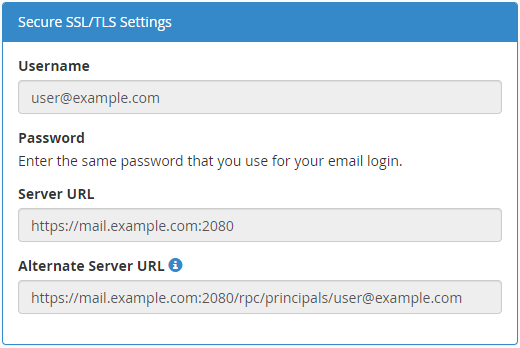
4. cPanel displays the information you need to auto-configure a local customer for server access:

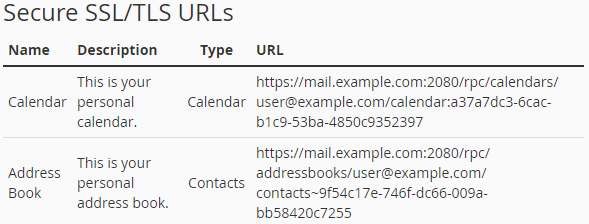
5. cPanel settings also include direct URLs which you’ll use if auto-configuration fails:

Step 2: Set up the local customer
After you’ve obtained the remote server configuration, you’re ready to set up local or mobile clients. Each client has its own unique interface, but the information required is the same.
"Remember that if auto-configuration on a client fails, you’ll always use the direct URLs to connect to a remote server."
The following steps demonstrate the way to configure the Microsoft Outlook CalDAV Synchronizer plugin:
1. Enter the required information in the server information settings:
- In the DAV URL text box, type the Server URL or Alternate Server URL from step 4 above.
- In the Username text box, type your full email address.
- in the Password text box, type your email password.
- in the Email address text box, type your full email address.

2. Click Test or discover settings to get a list of available calendars and contact lists. Choose the calendar or contact list that you want, then click OK. For this customer, you must repeat the method for every calendar or contact list you want to add. Other clients may function differently.
3. If auto-configuration doesn’t work, type the direct URL for a calendar or contact from the Secure SSL/TLS URLs shown in step 5 above, then click Test or discover settings.

